How To Play A Backhand In Badminton - Clear, Drop And Smash
Having a good backhand is really important, and so many of you have asked us how you can improve yours. It is one of the hardest areas in badminton at all levels, but once perfected, you can use it to play a variety of shots and also get yourself out of a lot of trouble!
How to play a backhand:
- Perform a split step.
- Chassee towards the corner.
- Pivot so that you are facing backwards.
- Change to a bevel grip.
- Keep your elbow low in preparation.
- Lunge just before you hit the shuttle.
- Allow enough room between you and the shuttle to rotate.
- Remain relaxed in your shoulders.
- Bring your arm through, using your wrist and forearm rotation to create power and control in the shot.
There are 4 main components that the above fit into:
- Your footwork and positioning on-court
- Correct grip
- The preparation of your arm and racket
- Correct hitting technique (each shot has a slightly different technique!)
If you can understand and execute these 4 areas well, you will be able to play accurate and powerful backhands from the rear court, with a variety of shots including drops, clears, and even smashes!
1. Footwork And Court Positioning
Throughout this blog we are focussing on perfecting the backhand drop, clear and smash, and for all three of these, your footwork and positioning on the court should be pretty similar. If you prepare differently for each shot, your opponent may notice and adjust their position, making their life a lot easier and yours a lot harder!
Your footwork starts as soon as your opponent has hit the shuttle. At this point, perform a split step from wherever you are on court and chassee (with your non-racket leg leading), and then pivot on this same leg so that you are facing backwards.
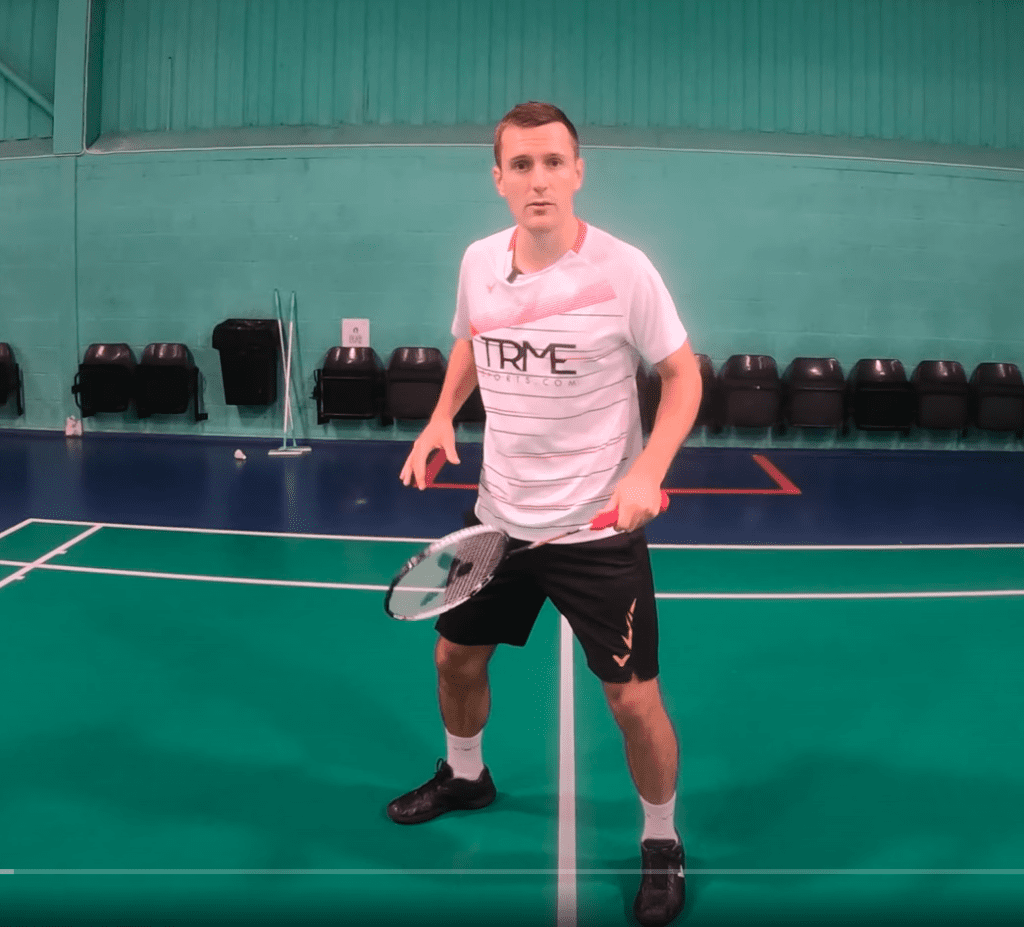
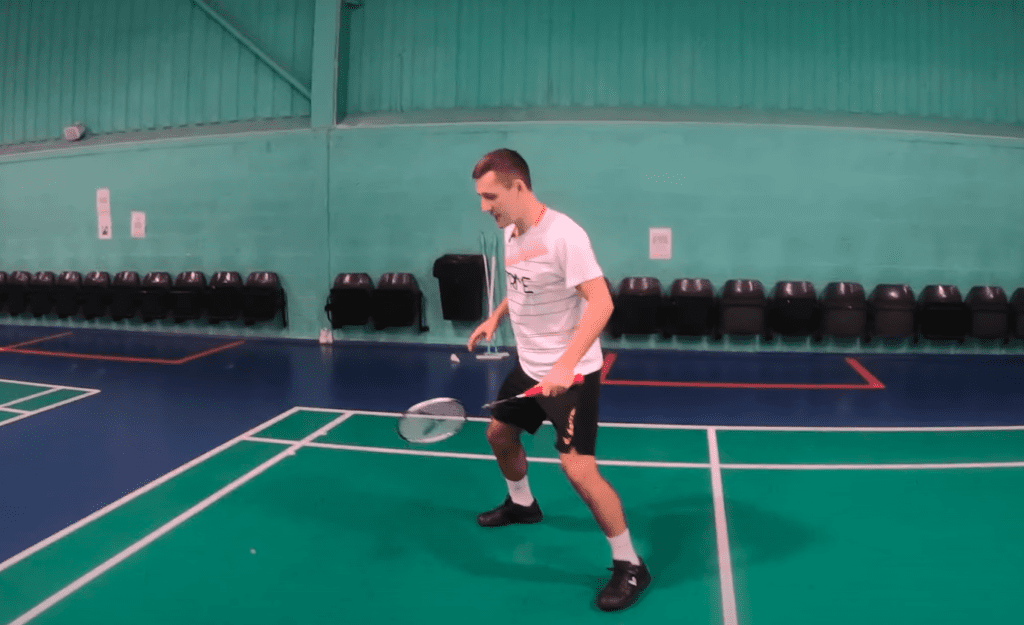
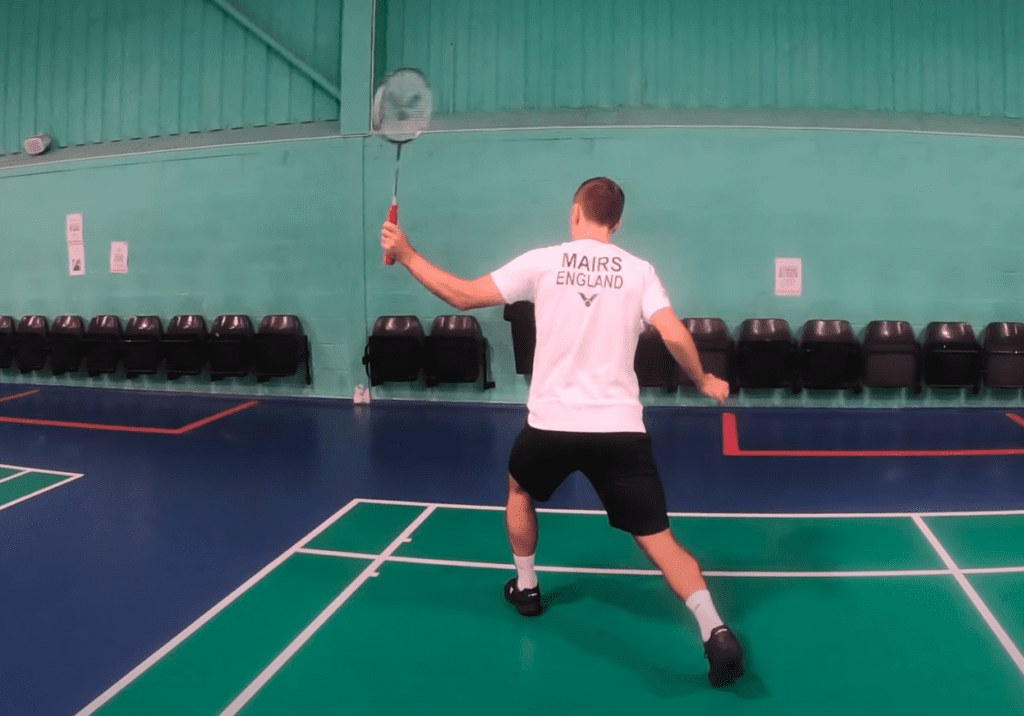
Of course, the size of your chassee step will depend on how tall you are and how far away you are from the shuttle! For example, a tall player may only take one small chassee step, compared to a smaller player, who will need a much bigger chassee or may even need to add an extra step!
Once you have pivoted and are facing backwards, you will need to lunge out to the corner with your racket leg, aiming to make contact with the ground just before you make contact with the shuttle. After this, you recover by using your racket leg to push off and enable you to rotate so that you are facing forwards again.
2. Grip
The way you hold your racket is a key part in having an effective backhand, specifically your thumb positioning. Where you have your thumb will depend on where you are making contact with the shuttle on your backhand side. Having the correct grip for each shot on court will enable you to perform an accurate and powerful shot.
When you are taking a standard rear-court backhand shot, you will need to use a bevel grip. To learn the bevel grip you can start in a backhand grip and move your racket head round so that your strings are now facing diagonally, and your thumb is on the ridge / bevel. You would move the racket anti-clockwise from your backhand grip if you are right handed, and clockwise from this position if you are left handed.
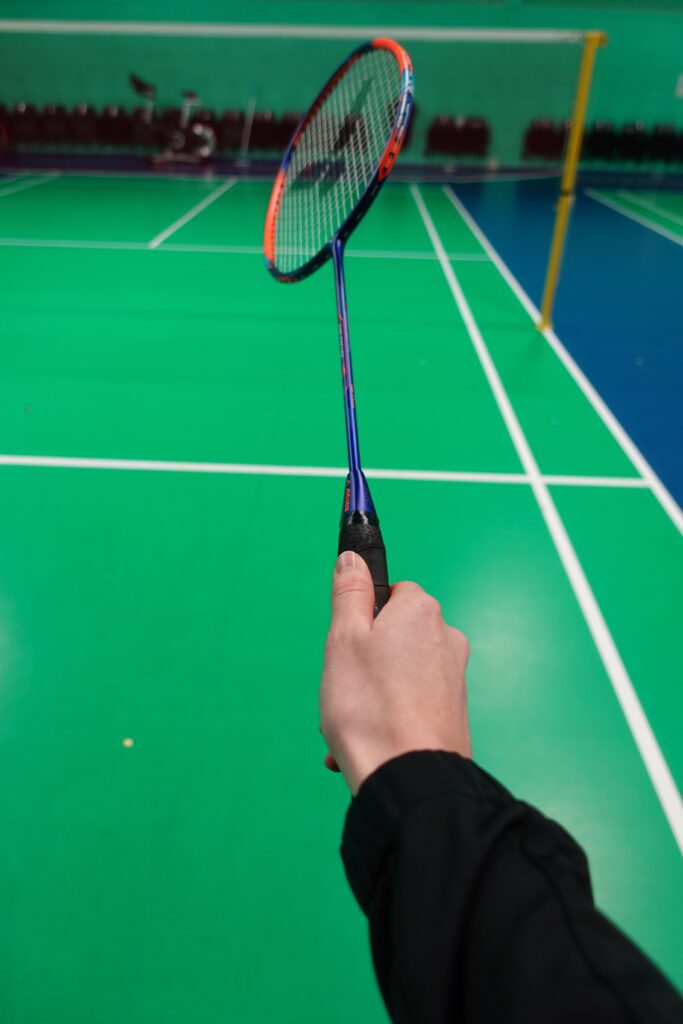
If you want to learn more about all of the grips in badminton (and what shots you would use these for), then check our blog post – The 4 Grips In Badminton.
It is important to have a relaxed hand up until the point of contact. At this point you squeeze your grip tight. The transition from being relaxed to squeezing tight enables your thumb and fingers to generate the necessary power.
💡 Having a relaxed hand until the point of contact isn’t just for backhands, this is important in pretty much all of your shots – it is surprising how much power you can generate from your thumb and fingers!
3. Racket Preparation
There are quite a few components to a good preparation of the backhand drop, clear and smash, so we have split them into 4 different sections.
Firstly, we want to discuss your elbow position. Many of you will have been taught that you should start your preparation with your elbow held high, however this is not the most effective method.
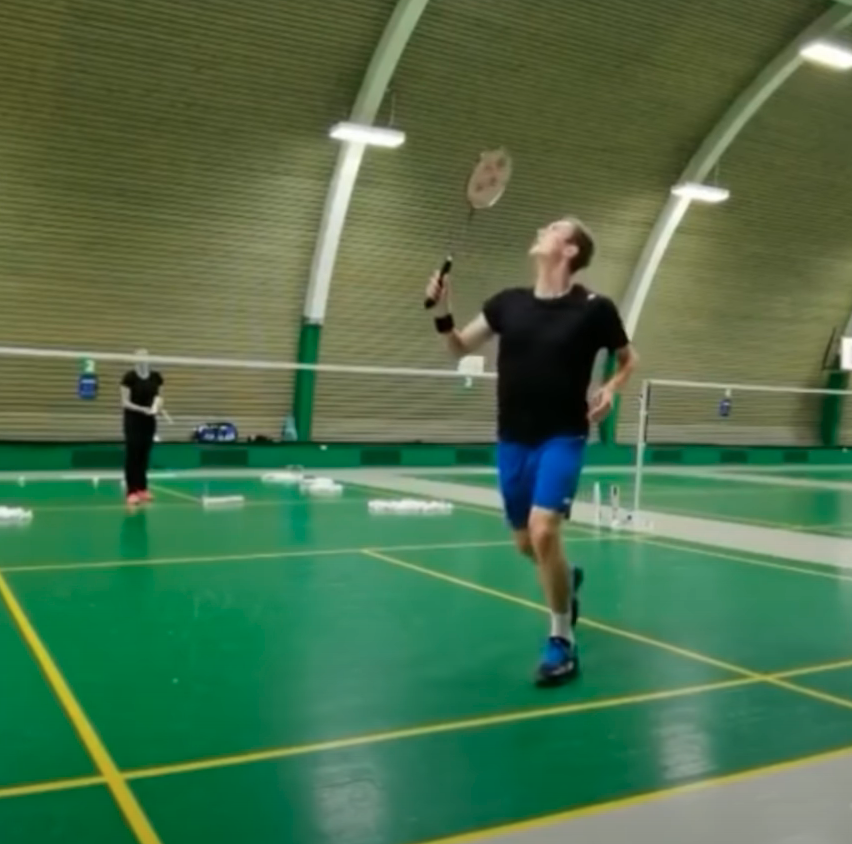
As you can see from the image below, professional players start their preparation with their elbow roughly in line with their bottom rib. This will enable you to ‘wind-up’ your arm and body more, therefore generating more power.
Like with the forehand smash, if you don’t use the rotation of your hips and shoulders in your shot you will be relying on your racket arm and shoulder to generate all of the power – this will inevitably provide you with less force output.
Secondly, as previously mentioned, having a relaxed arm and grip is so important! This allows you to get more of a squeeze of the grip when you strike the shuttle which generates the power in a smash and clear! Generally, a player with more ‘tension’ in their technique will generate far less power than a player whom is very relaxed.
A common mistake we see when playing a backhand is the body positioning. Of course it is unrealistic for you to expect that you will be in a perfect position for each shot, however it is important to try not to be too close (or far away!) from the shuttle at the point of contact.
- If you are too close, your ability to generate power will significantly decrease, as your arm, shoulder and body will be too tucked in and not able to create optimal rotation.
- However, if you are too far away with your arm straight, then you will have less control over your racket swing, meaning a far worse quality of shot!
- Therefore, being in a position where you can have a slightly bent arm upon the point of contact is ideal for both power and quality.
Think of it like you are throwing a punch in boxing – you can’t generate enough power when your elbow and arm are tucked in to your body, but you also don’t want to punch with your arm completely extended!
Finally, the preparation for all of your backhand shots should be the same. This is to ensure that your opponents will be unable to see which shot you are going to play until the very last second. Even small changes in your preparation techniques between a backhand drop, clear and smash, will reduce the overall effectiveness of the shot.
4. Hitting Technique
General Technique
This section discusses the general technical tips that apply to the rear-court backhand drop, clear and smash. We will go onto discuss the individual technical points for each shot in following sections.
For every backhand shot, you should aim for your racket leg to make contact with the ground just before you strike the shuttle. This will allow you to have the freedom to alter your position until the last second, as well as using the force of your step and landing to generate even more power in the shot.
As you are preparing for your backhand, there should be a simultaneous rotation of your legs and hips, but make sure you also track the shuttle with your eyes and arm alongside this. It is also important to cock your wrist slightly during the preparation of the backhand. Having a cocked wrist will enable you to angle your racket into court more, and therefore help you guide the shuttle into court rather than out the side!
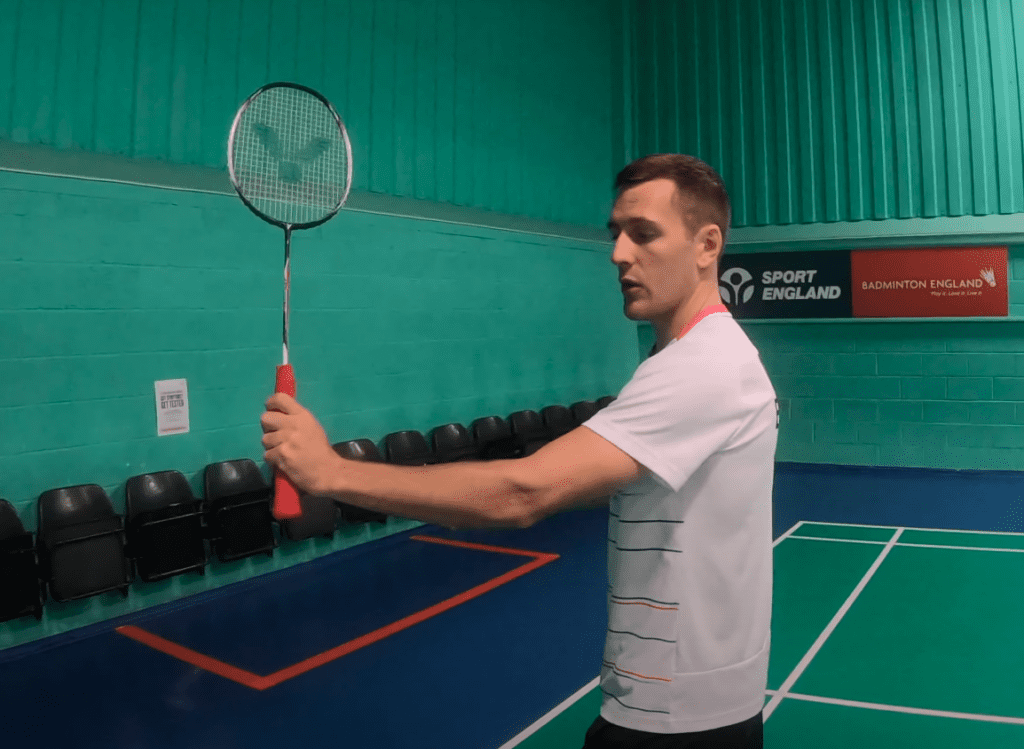
As you make contact with the shuttle, your racket shaft needs to be vertical, with the strings facing forwards, angling to where you are aiming for. So if you are playing cross-court, you will need to turn your racket slightly at the last second, again towards where you want your shot to land.
Backhand Drop
A backhand drop should be played when you want to neutralise the rally, and not give away the attack. For example, when your opponent isn’t stepping up and pressurising the front of the court a backhand drop may be a good choice.
A few key points that will help you improve your backhand drop, whilst remaining in control with high accuracy are:
- Aim to keep the shuttle on your strings for longer than the smash and clear.
- Instead of having to hit the shuttle at it’s highest point, you can let it drop to a more ‘comfortable’ hitting height.
You can easily practice this by pushing the shuttle to a feeder (from the mid/forecourt on your forehand side), putting you slightly out of position, then get them to lift into your backhand corner, so you are forced to take it later than usual!
However, it is important to remember, even though you are playing a slower shot, it is essential still to recover as quickly as you can.
Backhand Clear
This is the shot that every player in the world wants to be good at – it is great to use when you need to get yourself out of trouble and reset the rally! It is also good to use when you feel your opponent has pushed up to the front of the court, anticipating the drop shot.
Unlike the drop, it is important to squeeze your grip more when you are striking the shuttle for a backhand clear, helping with that power generation! Compared to the drop, where your body rotation as you strike the shuttle is more controlled, you can generate more power for a clear by quickly rotating your body and shoulder upon contact.
💡 Make sure your racket has a flat face when striking the shuttle! Striking with a slightly angled racket face will cause you to put some slice on the shuttle, therefore reducing your shot power and accuracy.
Similar to the drop shot, you want your racket leg to land momentarily before you make contact with the shuttle to help with your power and body stability. You should also ensure that you are making contact with the shuttle in a position where you have room to have a slight bend in your arm.
Regarding your recovery from a backhand clear, because you tend to use it to get out of trouble or push your opponent to the back of the court, we recommend recovering into a more defensive position than when hitting a drop or smash!
Backhand Smash
The backhand smash can be used when you are slightly earlier onto the shuttle than for the drop or the clear. This smash can be effective by putting the pressure back on to your opponent, and maybe even catching them by surprise!
Compared to the backhand drop and clear, your body rotation must be a lot quicker, and with your accelerated movement, you will be able to take the shuttle a little earlier. You will also need to perfect your forearm rotation to have an effective backhand smash, allowing you to get that ‘whipping’ effect!
Similarly to the clear, if you want to smash cross, you will need to shift the momentum of your racket and body in the direction that you are hitting the shuttle in. This will increase your accuracy and power!
The backhand smash is a difficult shot, and even when you perfect this technique, it is unlikely you are going to be hitting lots of winners from it… However, it should put you back on the attack, meaning your recovery stance should be a little higher up the court, making you ready to pounce on your opponents weak return!
Learn More
If you’d like to watch our YouTube video on how to play the backhand drop, clear and smash for more visual demonstrations, you can do so below.

